Android

Random Boot Sound Using Notification SoundsPreboot requires init.d. See the OP for enabling it if you are on a stock rooted ROM and requires the file to be readable and executable (“chmod 755” works fine).
Postboot requires an app such as Scripter (ROM Toolbox) or Script Manager to execute the script at boot.

Requires the variable $RANDOM. You can make sure it’s available from the command line (“echo $RANDOM”).

Use this script at your own risk. I provide no warranties or guarantees.

What does this script do?

  1. Check for carrier boot up sounds (sub folders in the “/system/media/audio/ui” folder) and copies them to “/system/media/audio/notifications” renaming them as needed.
  2. Create symlinks in the above folders to “/system/media/audio/ui/PowerOn.ogg”.
  3. Check if “/system/media/audio/notifications/PowerOn.ogg” is present and copies “/system/media/audio/ui/PowerOn.ogg” there if it’s not.
  4. Count the number of files in “/system/media/audio/notifications”.
  5. Grab a random number between 1 and the number of files found inclusive (math notation: “[1, numFiles]”).
  6. Go through “/system/media/audio/notifications” and copy the file at index random to “/system/media/audio/ui/PowerOn.ogg”.

Notes:

  • The stock file is included. If you want a different sound in its place, you can either comment out that line in the script and delete the “/system/media/audio/notifications/_PowerOn.ogg” files from “/system/media/audio/notifications” or just replace “/system/media/audio/notifications/PowerOn.ogg” with some other sound file and still delete the “/system/media/audio/notifications/_PowerOn.ogg” files from “/system/media/audio/notifications”.
  • If you want more sounds, just copy them to “/system/media/audio/notifications” (OGG files only).
  • The script does not check for valid files and blindly renames the destination file to “PowerOn.ogg”.
  • It does not look in “/sdcard/media/audio/notifications” or anywhere else for audio files.
  • I do not recommend using alarms or ringtones files as they are usually looped which can cause the media scanner to get stuck and overheat your phone or tablet – those files may continue to play even if you can’t hear them.
  • If you can’t hear a sound on boot, it is likely that the file is either invalid or has no audio (ex: my /system/media/audio/ui/BST/PowerOn.ogg has no audio).
  • It was tested and works on a Samsung Galaxy S2 (stock JB 4.1.2) and a Samsung Galaxy S4 (stock JB 4.2.2) both from Sprint and using stock kernels.
  • There’s no obvious reason it won’t work on other phones and tablets with other ROMs from other carriers.
#!/system/bin/sh

mount -o remount,rw /system

cd /system/media/audio/ui
for X in "BST" "SPR" "VMU" "XAS"; do
 if [ $(realpath "/system/media/audio/ui/$X/PowerOn.ogg") = "/system/media/audio/ui/$X/PowerOn.ogg" ]; then
  mv "/system/media/audio/ui/$X/PowerOn.ogg" "/system/media/audio/notifications/${X}_PowerOn.ogg"
  ln -s "/system/media/audio/ui/PowerOn.ogg" "/system/media/audio/ui/$X/PowerOn.ogg"
 fi
done

if [ ! -f "/system/media/audio/notifications/PowerOn.ogg" ]; then
 cp "/system/media/audio/ui/PowerOn.ogg" "/system/media/audio/notifications/PowerOn.ogg";
 chmod 644 "/system/media/audio/notifications/PowerOn.ogg"
fi

cd /system/media/audio/notifications
FILES=0
for Y in *; do
 let FILES=$FILES+1;
done

let X=$RANDOM%$FILES
let X=$X+1

FILES=0
for Y in *; do
 let FILES=$FILES+1;
 if [ $FILES = $X ]; then
  cp "/system/media/audio/notifications/$Y" "/system/media/audio/ui/PowerOn.ogg";
  chmod 644 "/system/media/audio/ui/PowerOn.ogg"
 fi
done

mount -o remount,ro /system

jb-bannerLittle Known Jelly Bean Features

Here are some features in Jelly Bean 4.1.2 and up that I’ve discovered that you may or may not be aware of:

  • Two-finger swipe down on a notification: If it’s expandable it will expand giving you more options. Two-finger swipe up will collapse it.
  • Swip a notification left or right to dismiss it. This does not work on persistent notifications.
  • Long-tap a notification to get a link to “App info” which takes you directly to the app’s info screen where you can uninstall, force-stop, or clear its cache, data, or defaults. Also handy for determining which app put it there.
  • Long-tap the app on the “Recent apps” dialog for the same “App info” link.
  • You can turn off notifications for spammy apps (or any app) from its app info screen. You cannot turn off notifications for some system apps.
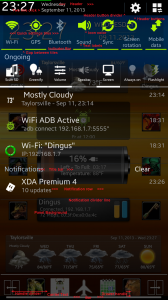
  • Long-tap a toggle on the top of the notification pull-down for direct access to that item’s settings screen.
  • Press either volume button to show the volume scale and tap the grey gear to expand it.
  • Tap the grey gear above the toggles on the notification pull-down to access the system settings.
  • Tap the grey clock above the toggles on the notification pull-down to access the world clock.
  • If you have no Search soft-key, you You can long-tap the Menu soft-key to access Search. This only works from the home/launcher screen. May not work in all apps.
  • You can add contacts to the Emergency Dialer by adding them to the “ICE – emergency contacts” contacts group then tap the “+” on the Emergency Dialer. You can add as many contacts as you want to the group; however, you can only add four to the Emergency Dialer at a time (only JB 4.2.2 and up).
  • Easter egg: Jelly Bean Bag. Execute the following from the command line. Root required. This is actually one of the Daydream modes (BeanFlinger) – still cool, though.
    su -c am start com.android.systemui.BeanBag

Note: I have not confirmed that these features are not available on older Android OS’s, they could very well be.

Make ADB localhost Work on Your Jelly Bean 4.2.2 DeviceIn Jelly Bean 4.2.2, ADB now uses RSA keys to explicitly allow certain clients. This poses a problem when attempting to use ADB on your phone locally and the ADB daemon won’t write its RSA key to disk due to the file system being read-only. This is the easiest way to make it work.

Disclaimer: I am not responsible for you doing this wrong and breaking your phone.

This will not work on Android 4.1.2 or older.

  1. Make /data/.android.
  2. Do one of the following:
    1. If you’re using a custom ROM with init.d, put the following into an init.d script.
      #!/system/bin/sh
      if [ ! -e "/.android" ]; then
          busybox mount -o rw,remount /
          mkdir /.android
          mount -o bind /data/.android /.android
          busybox mount -o ro,remount /
      fi
    2. If you have hacked in init.d support by hooking the debuggerd binary, add the script above to your debuggerd script *or* an init.d script.
  3. Reboot the device (if you used option 2 in the previous step, restart the debugger (“stop debuggerd; start debuggerd“)).
  4. After the phone boots completely, check /.android for contents. If it’s empty, restart usb debugging (either from Developer Options (toggle USB Debugging off and back on) or via the command line (“stop adbd; start adbd“)). There should now be stuff in /.android.
  5. Append the contents of /.android/adbkey.pub to /data/misc/adb/adb_keys (“cat /.android/adbkey.pub >> /data/misc/adb/adb_keys; echo “” >> /data/misc/adb/adb_keys“).
  6. Start the ADB server on the phone from the command line using ADB on your PC or a terminal emulator.

    root@android:/ # adb start-server
  7. The phone should pop the authentication dialog – click OK. If the authentication dialog doesn’t pop, follow the striked out steps above.

Edit [08/02/2014]: Turns out two of the above steps aren’t required. Steps amended above.

Notes:

  • Don’t delete /data/.android or the contents therein.
  • Tested on my SGS4 with hacked-in init.d support.
  • You can also find the abdkey.pub file on your Windows’ PC here, C:\Users\[user name]\.android\abdkey.pub. Copy it to your device, then append it to /data/misc/adb/adb_keys and you won’t need to initially use the USB to allow the PC connection.

Before:

root@android:/ # adb shell ls
* daemon not running. starting it now on port 5038 *
* daemon started successfully *
error: device offline
255|root@android:/ #


After:

root@android:/ # adb shell ls
* daemon not running. starting it now on port 5038 *
* daemon started successfully *
MSM8960_lpm.rc
acct
cache
carrier
charger
config
d
data
data_1
data_2
data_3
default.prop
dev
efs
etc
extSdCard
file_contexts
firmware
firmware-mdm
fstab.qcom
init
init.carrier.rc
init.goldfish.rc
init.qcom.class_core.sh
init.qcom.class_main.sh
init.qcom.early_boot.sh
init.qcom.lpm_boot.sh
init.qcom.rc
init.qcom.ril.sh
init.qcom.sh
init.qcom.syspart_fixup.sh
init.qcom.usb.rc
init.qcom.usb.sh
init.rc
init.target.rc
init.trace.rc
init.usb.rc
mnt
mnt_1
persdata
preload
proc
property_contexts
res
root
sbin
sdcard
seapp_contexts
sepolicy
storage
sys
system
tombstones
ueventd.goldfish.rc
ueventd.qcom.rc
ueventd.rc
vendor
root@android:/ #

Recommended Apps

These are some of the apps I like.

  • Please don’t ask me for support, these are not my apps. I will not be forwarding support requests to their respective devs. I will also refuse any requests for free paid apps.
  • Some apps require special installation steps, please follow them to the letter.
  • Some apps only work on specific devices, ROMs, or Android versions and most of the following require a rooted device.
  • These are mainly for rooted devices and I’m not listing “fun” apps or “social” apps. Y’all can make your own decisions on those. The links are not necessarily to the free version. Some do have a free version.
  • Titanium Backup – Backs up apps and their data. The best backup solution I have found.
  • Root Explorer – As the name suggests, it’s a file explorer.
  • Greenify – Stops the chosen apps from running in the background.
  • Xposed Framework – Modifies the framework so one can do things. It doesn’t do anything by itself. It just provides a bridge for other people to write modules.
  • Jota Text Editor – A plain text editor that doesn’t truncate large files. Also color codes some scripting/programming languages like PHP and Java.
  • Partition Table – Shows you the exact size of your device’s eMMC partitions.
  • Screen Notification – Turns on the screen when a chosen app adds a notification.
  • Link2SD – Moves APK, DEX, and library files to a second partition on your SD card.
  • FolderMount – Moves data from one folder to another then binds them to trick the system into using the new location. It is intended to move data from the internal SD card to the external SD card as some apps don’t let you chose where you want them to put their shit.
  • ROM Toolbox – Provides a centralized interface for some system tweaks like boot animations and DPI settings.
  • Tasker – Does chosen things when chosen things happen.
  • Nottach – You can change numerous visual settings on the stock ROM. Works only on the SGS4. It was written for AT&T’s variant, but also works on Sprint’s.
  • WiFi ADB – Access ADB over WiFi.
  • Xposed App Settings – Override multiple settings on a per app basis. Settings include font size, DPI, and resolution and you can revoke permissions. You can also get other Xposed modules from this same link.
  • ADBd Insecure – Allows ADB root on stock kernels.
  • File Converter – Convert one type of file to another. E.g. .MPG to .MP3 (rip the audio track).
  • Muti-DPI Play Store – Google has this weird restriction on some apps when the device’s DPI is not stock. This is the workaround. Comes in white (standard) and black (inverted).
  • Wanam Xposed – Like Nottach, but with some other options.

Useful Shell Commands

Disclaimer: I am not responsible for you doing things wrong and breaking your phone or losing your data.

  • Get Your MSL: (if this doesn’t work, you may need a different toolbox binary)
    getprop ril.MSL
  • Execute a command or file as root even if you’re not using the root shell: (handy over ADB with a secure kernel)
    su -c COMMAND|FILENAME
  • Reliable screenshot: (even works on 4.2.2; however, if you’re saving the screenshot to the internal SD card with emulated storage, you must use its real path which is “/data/media/0” – works best with ADB, Tasker, or something automated so you don’t just screenshot the shell emulator)
    screencap FILENAME
    adb shell su -c screencap /data/media/0/test.png
    adb shell su -c screencap /storage/extSdCard/test.png
  • Clear cache:
    rm /data/dalvik-cache/*
    rm -r /cache/*
  • Delete all app data:
    rm -r /data/data/*

Increase Battery Life and Reduce Game Load TimeIf you’re like me and don’t care about super-high quality graphics, you can use Xposed App Settings to tell apps to run games and other apps at a lower screen resolution. The dimensions of the apps remain unchanged and I haven’t noticed a difference visually, but the apps load faster and I’ve gotten more battery life.

  1. Install Xposed Framework.
  2. Install Xposed App Settings.
  3. Clear the data of the app for which you want to change the resolution.
  4. Open Xposed App Settings
  5. Search for the app.
    2013_08_13_20.02.01
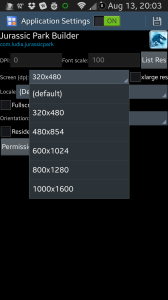
  6. Change “Screen (dp)” to something small (I used “320×480”).
    2013_08_13_20.03.08
  7. Click the floppy disk icon (top right).
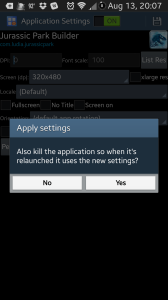
  8. Click “Yes” to kill the app if asked.
    2013_08_13_20.07.47
  9. Exit Exposed App Settings
  10. Start the app. It will now redownload and/or reinstall lower resolution graphics.
  11. Enjoy!

Update: Not all settings in App Settings will work. You’ll have to play with it some to figure out which settings work.

Disclaimer: I am not responsible for you doing things wrong and breaking your phone or losing your data.

I recently found out that my debuggerd hack to enable init.d support on my stock SGS4 wasn’t working. So, I did this and now it works.

Make a file named “install-recovery.sh” and drop it into /system/etc. Whatever script you put in here will execute at boot up so long as the user/permissions are correct.

chown shell:shell "/system/etc/install-recovery.sh"
chmod 755 "/system/etc/install-recovery.sh"
chmod u=rwx,a=rx "/system/etc/install-recovery.sh" # busybox must support symbolic modes

My “/system/etc/install-recovery.sh” script:

#!/system/bin/sh
LOG="/data/install-recovery.log";

echo "Executing install-recovery.sh" > $LOG;
echo "" >> $LOG;

echo "$(date) install-recovery hack..." > $LOG
echo "" >> $LOG
echo "init.d" >> $LOG

# I can't get run-parts to work for some reason, but this will run every *.sh script in /system/etc/init.d as root.
for N in /system/etc/init.d/*.sh; do
	su -c "$N" 1>>$LOG 2>>$LOG
done;

Notes:

  • Mount binding (in JB 4.2.2+) seems to work. E.g. mount -o bind /folder1 /folder2
  • $(date) does not provide the correct date (mine said: “Wed Apr 15 13:24:13 MST 1970”).
  • The Package Manager is not available. (There may be other unavailabilities, but I don’t intend to test it thoroughly.)

Google Launcher

Google included their own Touchwiz-like launcher in their latest Android release, Kit Kat 4.4, which works flawlessly on Jelly Bean 4.1 and 4.2. (See thread [APP]Get Android 4.4 Launcher on your phone NOW!! @ XDA.)

Here are some interesting things I’ve discovered as I’ve been playing with it:

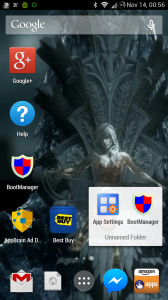
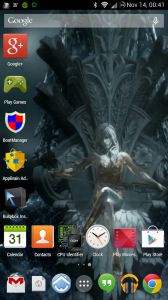
  • If you’re rooted, get Xposed and App Settings. Changing Google Search’s DPI will dynamically change the amount of real estate onto which you can put more/fewer shortcuts and/or widgets. For example: on my SGS4, setting its DPI to 350 makes it 6 columns wide by 6 columns high with 6 available slots in the dock bar (42 total on one screen). 250 makes it 8 columns by 5 rows with 8 dock slots (48 slots total). The stock SGS4 DPI of 480 results in a launcher with 4 columns by 4 rows and 4 dock slots (20 slots total). The app drawer also changes dimensions with the DPI.

    Open folder @ 480 DPI.

    Open folder @ 480 DPI.

    350 DPI

    350 DPI

    250 DPI

    250 DPI

    480 DPI

    480 DPI with folder

    400 DPI

    400 DPI

  • You can add screens by dragging a shortcut or widget off the right side of the screen.
  • You can make a folder by dropping a shortcut onto another shortcut which, when open, can be renamed by clicking “Unnamed Folder”.
  • Add shortcuts by dragging them from the drawer (accessible by clicking the circle with 6 dots on the dock) and dropping them where you want them.
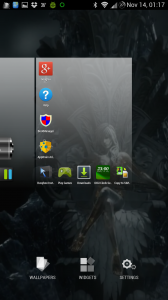
  • Long-click an empty slot or click the menu key to access wallpapers, widgets, and Google Now settings. You can also drag the screens around in this view.

    Main Menu

    Main Menu

  • Click “Widgets” and drag a widget to a screen and drop it where you want it.
  • Some widgets are resizable. Long-click the widget to pick it up, then drop it in the same spot. If the resize square shows, you can resize it.
  • Swipe all the way to the left to access Google Now.
  • You can fling shortcuts and widgets to the top of the screen to remove them from the screen.

There are some caveats:

  • You can’t hide the labels on the shortcuts or folders.
  • Most widgets can’t be resized.
  • The action bar at the top will stop short on the right if the DPI is too low.
  • You can’t move the app drawer shortcut.
  • You only get one dock.
  • You can’t access the phone’s settings except by adding the Settings shortcut to the launcher or clicking the button on the notification panel.
  • It doesn’t rotate with the screen.

My SGS2 is Dying

My SGS2 (Epic 4G Touch). The third in the sad line of SGS2s owned by me. The first one fell victim to the eMMC bug from a leaked ICS ROM. The second one died because I was trying to reflash the stock ICS which failed for some reason. Instead of closing the One-Click Odin flasher, I tried to reflash a second time (note that closing it and reopening is required). The third one, which I’ve had the longest, was getting hot. Like super, fry eggs on the glass hot. I tried to resolve this by wiping the data and reflashing the stock JB ROM. Unfortunately, it is still getting blazing hot. I’m afraid he’s not long for this world. Pray to whatever God you believe in that he may rest in peace.

Update: I was mistaken. It’s not getting blazing hot anymore. It still has problems, but at least it’s not hot enough to melt steel.